Secure Power, Swift Connections

In the world of electrical connections, reliability and safety are paramount. Whether you're an electrician working on a commercial project or a DIY enthusiast tackling a home improvement task, the quality of your connections can make all the difference. One essential component that ensures secure and long-lasting electrical connections is the insulated crimp terminal. These small but mighty devices play a crucial role in protecting wires, preventing short circuits, and maintaining consistent electrical flow. In this comprehensive guide, we'll explore everything you need to know about insulated crimp terminals, from their types and applications to proper installation techniques and maintenance tips.
Insulated crimp terminals are specialized connectors designed to join two or more wires together while providing electrical insulation. Unlike bare crimp terminals, which expose the metal connection point, insulated versions feature a protective covering made from materials like vinyl, nylon, or heat-shrinkable plastic. This insulation serves multiple purposes: it prevents accidental contact with live wires, protects against moisture and corrosion, and provides a visual indicator of the terminal's wire gauge compatibility. The insulation also helps to reduce the risk of short circuits, which can lead to equipment damage or even fire hazards.
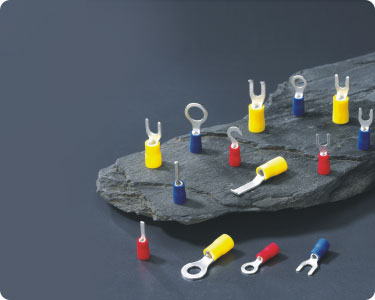
There are several types of insulated crimp terminals available, each designed for specific applications and wire sizes. The most common types include ring terminals, spade terminals, butt splices, and fork terminals. Ring terminals feature a circular end that fits over a screw or stud, making them ideal for permanent connections in electrical panels or equipment. Spade terminals, with their flat, blade-like design, are perfect for quick and easy connections to terminal blocks or circuit breakers. Butt splices are used to join two wires end-to-end, creating a continuous electrical path, while fork terminals provide a secure connection that can be easily removed and reattached when needed.
When selecting insulated crimp terminals, it's important to consider the wire gauge, current rating, and environmental conditions of your application. The terminal must be compatible with the wire size you're using to ensure a proper crimp and electrical conductivity. Most terminals are color-coded according to the American Wire Gauge (AWG) system, with red typically indicating 22-18 AWG, blue for 16-14 AWG, and yellow for 12-10 AWG. This color coding makes it easy to identify the correct terminal for your wire size at a glance.
Proper installation is key to maximizing the performance of insulated crimp terminals. The process begins with preparing the wire by stripping the insulation to the correct length—usually about 1/4 to 3/8 of an inch, depending on the terminal size. It's important not to strip too much wire, as this can leave exposed metal that may cause short circuits, or too little, which can prevent proper contact. Next, insert the stripped wire into the terminal's barrel, ensuring that the wire strands are fully seated and no insulation is inside the crimp area. Using a high-quality crimping tool, apply firm, even pressure to the terminal's barrel to create a tight, gas-tight connection. The crimp should be uniform around the wire, with no gaps or loose strands. Finally, inspect the connection to ensure that the insulation is properly seated and the terminal is securely attached to the wire.
One common mistake when using insulated crimp terminals is using the wrong crimping tool. While it may be tempting to use pliers or a hammer to crimp the terminal, these methods often result in inconsistent crimps that can lead to poor conductivity or even connection failure. Instead, invest in a ratcheting crimping tool designed specifically for insulated terminals. These tools apply the correct amount of pressure and ensure a uniform crimp every time, reducing the risk of connection problems down the line.
Maintenance of insulated crimp terminals is relatively simple but essential for ensuring long-term performance. Regular inspections should be conducted to check for signs of damage, such as cracked insulation, loose connections, or corrosion. If any issues are found, the terminal should be replaced immediately to prevent electrical problems. In harsh environments, such as those with high moisture or chemical exposure, it may be necessary to use heat-shrinkable insulated terminals, which provide an extra layer of protection against the elements. Heat-shrinkable terminals are activated by applying heat, causing the insulation to shrink tightly around the terminal and wire, creating a waterproof seal.
In conclusion, insulated crimp terminals are an indispensable component in any electrical project, providing secure, reliable connections that stand the test of time. By understanding the different types of terminals available, selecting the right one for your application, and following proper installation techniques, you can ensure that your electrical connections are safe, efficient, and long-lasting. Whether you're working on a small DIY project or a large-scale commercial installation, investing in high-quality insulated crimp terminals and the right tools will pay off in the form of fewer problems and greater peace of mind. So the next time you're faced with an electrical connection task, remember the importance of insulated crimp terminals and use them to create connections you can trust.